
The most effective way to remove kitchen grease buildup is also the gentlest: warm water, a few drops of grease-cutting dish soap and a soft cloth wrung out until it’s just damp, followed by a clean rinse and an immediate dry. That’s how to remove grease from kitchen cabinets on almost every finish, and the same method handles most stove tops. Move up to a baking-soda paste only for spots that stay sticky. Gas grates and range hood filters come clean faster in a hot soapy soak than under a scrub brush, and glass cooktops need a cooktop cream and a razor scraper for burned-on residue. Below is the full method for each surface, plus what to avoid on each finish so the grease comes off and the finish stays on.
Key Takeaways
- Start with dish soap and warm water on a damp (not wet) cloth, then rinse and dry right away. Most kitchen cabinet grease removal never needs anything stronger.
- Match the cleaner to the finish: a cabinet manufacturer advises against vinegar on laminate, melamine and acrylic, and Whirlpool advises against vinegar- and citrus-based cleaners on traditional stainless steel.
- Soak gas grates and metal hood filters instead of scrubbing them; on glass tops, use cooktop cream and a razor scraper held at about 45 degrees.
- Wash metal mesh hood filters about every 3 months, more often if you fry a lot. Carbon filters are replaced, not washed.
- Run the range hood every time you cook and for 10–20 minutes afterward, and cook on the back burners when you can.
Why Kitchen Grease Turns Sticky — and Where It Hides
Cooking puts tiny droplets of oil into the air, especially when you fry, sear or stir-fry. Most of that oil rises with the heat and steam and settles on the nearest surfaces. A thin, fresh film wipes away easily. The problem is time: each new layer catches dust and lint, and older layers thicken and harden into a tacky, yellowish coating. That’s why a quick pass with a dry or barely damp cloth tends to smear sticky buildup around instead of lifting it, and why the first step in learning how to clean greasy kitchen cabinets is softening that film rather than attacking it.
Grease doesn’t land evenly. The heaviest layers usually sit on the cabinet doors directly above and beside the stove, on the tops of the upper cabinets (warm air from the cooktop carries vapor straight up), on handles and knobs where hand oils mix with cooking oil, on the underside of the range hood and its filter, and on the backsplash.
It’s worth staying ahead of for more than looks. According to the U.S. Fire Administration, cooking is “by far, the leading cause of home fires and home fire injuries.” Grease sitting on a hood and filter is directly above the burners, so keeping it clean simply means less fuel close to the flame.
Before You Start: Supplies, Safety and the Gentle-to-Strong Ladder
You don’t need a specialty kitchen degreaser for most homes. The basics below, along with a few simple homemade cleaners, cover nearly every grease job in the kitchen:
- Grease-cutting dish soap (hand dishwashing liquid, not dishwasher detergent)
- Several microfiber cloths, plus one kept dry for drying
- A soft sponge and a non-scratch scrub pad
- A soft-bristle brush or old toothbrush
- Baking soda and a small bowl for mixing paste
- A spray bottle, rubber gloves and a sturdy step stool
- A single-edge razor scraper (for glass or ceramic cooktops only)
Safety first: never mix bleach with ammonia, vinegar or other cleaners. The Washington State Department of Health warns that bleach and ammonia produce toxic chloramine gases, and bleach combined with an acid such as vinegar gives off chlorine gas. Open a window or run the hood while you work, and keep water away from gas igniters and electric controls. Routine kitchen grease doesn’t call for ammonia or oven cleaner at all.
The rule that saves the most finishes is simple: start at the top of this ladder and only move down when the step above has stopped working.
| Step | What to use | Move to the next step when… | Stop and rethink if… |
|---|---|---|---|
| 1 | Warm water + a few drops of dish soap | The surface still feels tacky after two passes | Water beads or soaks into bare edges |
| 2 | Dish soap straight on a damp cloth, left on briefly | Hardened patches survive | The finish turns dull or cloudy |
| 3 | Baking-soda paste, gentle circles | Thick, baked layers remain | You see fine scratches or color loss |
| 4 | Finish-specific step: wood soap, cooktop cream + scraper, or a hot soak | — | Grease is gone but the surface feels rough |
| 5 | Stop cleaning | — | Rough, blotchy or bare spots mean a finish problem, not grease |
This ladder is also the honest answer to “what’s the best degreaser?” For most kitchens, it’s dish soap applied the right way; stronger products earn their place only on specific surfaces, covered below.
How to Remove Grease From Kitchen Cabinets
Cabinets are where kitchen grease is most visible and where the wrong cleaner does the most damage, so go slowly here. Decor Cabinets’ care guide names dish soap and warm water as the preferred cleaner and warns against letting liquid sit on the finish — which is exactly the method below.
- Clear the counter under the cabinets and lay down a towel to catch drips.
- Mix warm water with a few drops of dish soap in a bowl or sink.
- Wring a microfiber cloth until it’s just damp, then work one door at a time from the top down, following the grain on wood.
- For spots that stay sticky, squeeze a little dish soap directly onto the damp cloth, let it rest on the spot for a minute, then wipe again.
- Rinse with a second cloth dampened in plain water to remove soap residue, which can leave a dull film and attract new dirt.
- Dry immediately with a dry microfiber cloth, including the edges and the area around the hinges.
That’s the core of how to clean grease off kitchen cabinets: it gets grease off cabinets without stripping, swelling or clouding them, usually in a few minutes per door.
How to Remove Grease From Cabinets Above the Stove (and the Tops of Your Cabinets)
The doors right above and beside the range carry the thickest layer in the kitchen. Steam from boiling pots and kettles also hits the undersides of these cabinets; Decor’s guide specifically advises keeping kettle and pot steam away from them. Plan on two or three soap passes here, letting the soapy cloth rest on each door briefly before wiping, and don’t skip the bottom edges and the underside of the cabinet box.
Cabinet tops are a separate job. Grab a step stool — you’ll usually find a layer of grease and dust you can’t see from the floor. Because the tops are often unfinished or rough, a baking-soda paste and a soft brush work well there, followed by a damp wipe and a dry one. Our cleaners’ practical tip for preventing grease on top of kitchen cabinets: once the tops are clean, line them with a washable liner or sheets of paper, so next time is a quick swap rather than another scrub.
Match the Cleaner to the Cabinet Finish
What’s safe on one cabinet finish can dull or swell another. This table summarizes what cabinet and appliance makers say, based on Decor’s care guide and Whirlpool’s care guidance for traditional stainless steel.
| Finish | Safe for grease | Avoid | Good to know |
|---|---|---|---|
| Stained or clear-coated wood | Dish soap; 50/50 vinegar occasionally; diluted wood soap | Ammonia, bleach, abrasives, silicone or wax polish, steam | Wipe with the grain |
| Painted | Dish soap, soft cloth | Magic erasers, abrasive pads, solvents, alcohol | Test first; paint can lift |
| Laminate, melamine, thermofoil, acrylic | Dish soap; gentle baking-soda paste | Vinegar, excess water at seams | Edges swell first |
| Stainless steel | Warm soapy water, with the grain | Vinegar- or citrus-based cleaners, steel wool, ammonia, oven cleaner | Check your model’s manual |
Decor allows a 50/50 white vinegar and warm water mix on wood, but specifically says it’s not recommended on melamine, UV lacquer, acrylic and laminate. Whirlpool’s guidance for traditional stainless steel goes further and rules out vinegar-based and citrus-based cleaners entirely. If you’re not sure what your cabinets are made of, treat them as the most delicate option and stick with dish soap.
Wood Cabinets: Getting Years of Grease Off Without Stripping the Finish
If you’re dealing with decades of layered grime, the goal is to remove grease from wood cabinets in thin layers rather than in one aggressive scrub. Here’s how to get grease off wood cabinets when dish soap alone isn’t enough:
- Do one full dish-soap pass to take off the top layer and show you where the heavy spots are.
- Switch to an oil-based wood soap such as Murphy Oil Soap, diluted per its label: about ¼ cup per gallon of warm water, or about ½ cup per gallon for heavy cleaning. The label lists cabinets among its uses and says no rinsing is required, but wring the cloth out well so the wood never gets wet.
- On stubborn spots, apply a baking-soda paste and work it in gentle circles, then finish along the grain.
- Repeat light passes instead of pressing harder — each pass softens the next layer.
- Dry the door and look at it under a raking light from a window or flashlight. If the wood looks rough, blotchy or bare, the finish is gone. Stop cleaning; that’s a refinishing job.
Resist the urge to polish afterward. Decor warns against silicone and wax polishes on cabinet finishes, because they leave a film that new grease grips onto.
Laminate and Painted Cabinets
To clean grease off laminate kitchen cabinets, use the same dish-soap method and keep the cloth barely damp. Swelling and peeling start at the seams and edges, so don’t let water run into them, and use baking-soda paste only with a soft cloth and light pressure. Skip vinegar on laminate and melamine, per the cabinet maker’s guidance above.
Painted cabinets need the gentlest approach of all. Grease can soften paint, so test any step on the inside of a door first and avoid magic erasers and abrasive pads, which can burnish or lift the paint along with the grime.
Handles, Hardware and the Wall Behind the Stove
Handles collect both hand oils and cooking grease, which is why they often feel sticky even after the doors are clean. If it’s practical, unscrew them and soak them in warm soapy water for a few minutes, scrub around the edges and screw heads with a toothbrush, then dry fully before reattaching. If they stay on, work soap into the edges with the toothbrush and wipe clean.
The backsplash and wall behind the range pick up the same film. Our guide to cleaning grease off kitchen walls covers painted and tiled surfaces in detail.
How to Clean Grease Off a Stove Top
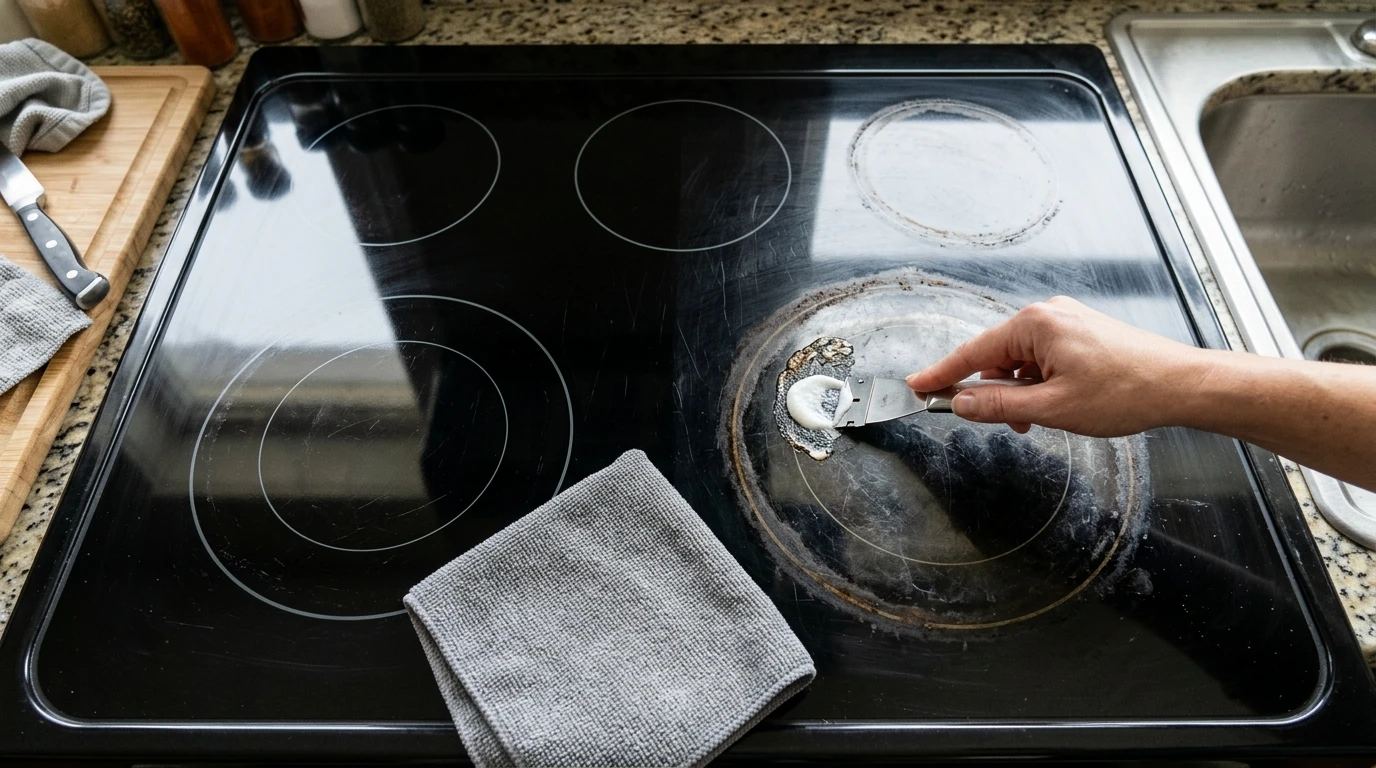
Always start with the stove off and fully cool, and remove the grates, burner caps or knobs where your model allows. Each type of stove top handles grease and scrubbing differently:
| Stove top | Everyday grease | Baked-on grease | Avoid |
|---|---|---|---|
| Gas (grates + surface) | Soapy cloth on surface; grates in a soak | Longer hot soak, then a brush | Water in igniters or burner ports |
| Glass or ceramic smooth top | Soapy cloth, rinse, dry | Cooktop cream + razor scraper | Abrasive pads, unapproved cleaners |
| Electric coil | Wipe surface; soak drip pans | Baking-soda paste on drip pans | Submerging the coil elements |
| Enamel or painted | Soapy cloth, rinse, dry | Soapy cloth laid on spot, then paste | Steel wool, scouring powder |
| Stainless steel cooktop | Soapy water, with the grain | Repeat soap soaks, nonabrasive sponge | Vinegar or citrus cleaners, steel wool |
The best way to clean grease off a stove is the same principle as the cabinets: let soap and time do the work, and reserve scraping for the surfaces built to take it. A quick soapy wipe once the burners have cooled after cooking is the easiest way to get grease off the stove before it has a chance to bake on.
Gas Stove Grates and Burner Caps
- Let the grates and burners cool completely.
- Lift the grates and burner caps into a sink of hot water with a generous squirt of dish soap, and let them soak — the soak does most of the work.
- While they soak, wipe the cooktop surface with a soapy cloth, then a damp rinse cloth.
- Scrub the grates with a brush. On coated or enameled grates, use a non-scratch pad instead of anything metal.
- Rinse and dry everything fully.
- Keep water off the igniters, reassemble, and light each burner to make sure the flame is even before you cook.
Glass and Ceramic Smooth Tops
GE Appliances’ glass cooktop instructions lay out a reliable method for residue that soap won’t move:
- Let the cooktop cool.
- Apply an approved ceramic cooktop cleaner to the residue.
- Hold a razor scraper at approximately a 45-degree angle against the glass and scrape, keeping a little cream on the spot as you go.
- Wipe away the loosened residue and cream, then buff with a clean, dry cloth.
GE also warns that sponges or cleaners other than the recommended ones can damage the cooktop, so check your own model’s manual before using anything else.
How to Remove Baked-On Grease From a Stove Top
Baked-on grease is grease that heat has hardened, and scrubbing harder usually scratches the surface before it moves the spot. Soften it first: lay a hot, soapy cloth over the area for several minutes, or spread a baking-soda paste and let it sit. Then lift it with the right tool for the surface — the scraper on glass, a non-scratch pad on enamel or painted tops, and a longer soak for grates and drip pans. Two or three light rounds will get baked-on grease off a stove top more safely than one hard one, and they make oven cleaner unnecessary for routine buildup (remember that oven cleaners are among the products that react with bleach).
When you’re done, wipe the counters on either side of the range too; if you have stone, here’s how to handle granite counters beside the range without etching them.
How to Clean a Range Hood and Its Filter
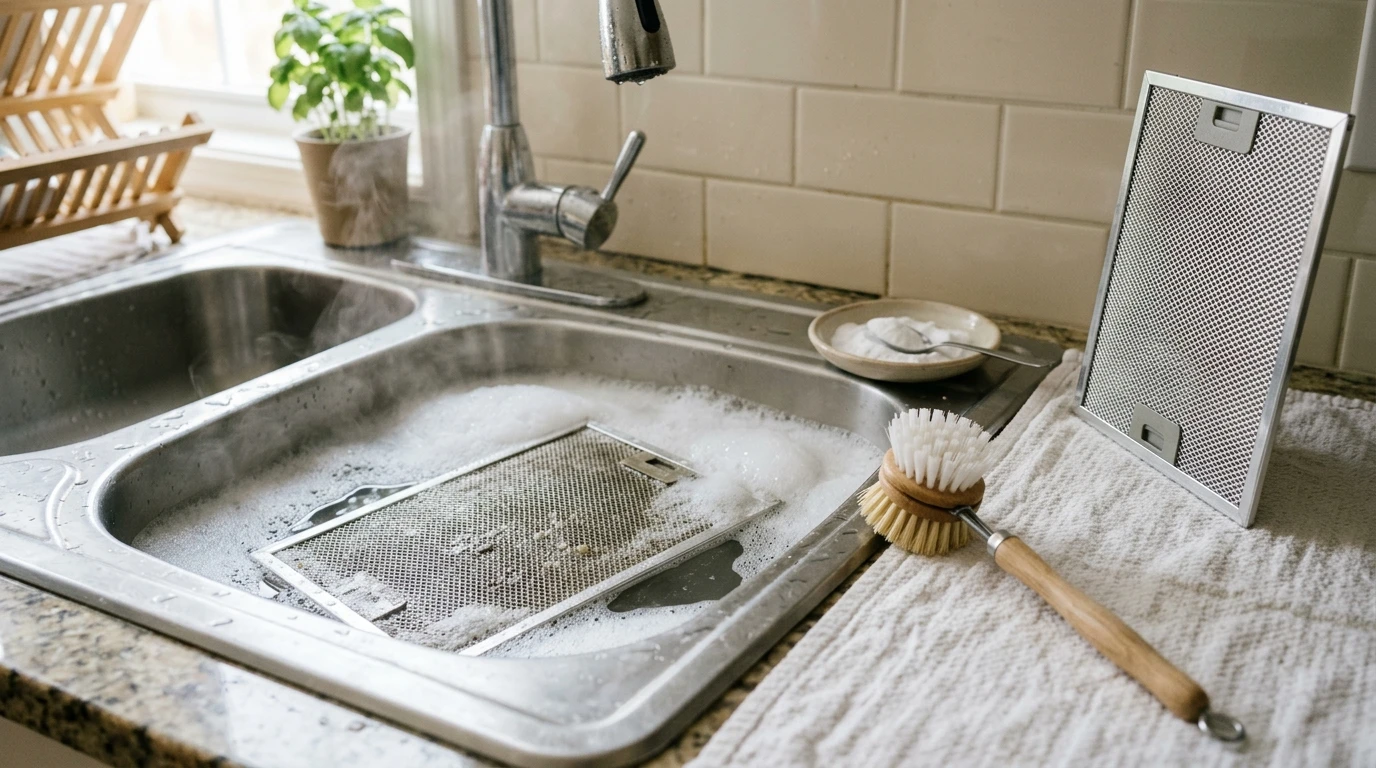
The filter is where most of the grease you never see ends up. A clogged filter also lets more grease drift past it and settle on the cabinets around the stove, so learning how to clean a range hood properly pays off on every surface in this article. On a greasy range hood, work from the inside out: clean or replace the filter first, then remove grease from the stove hood’s underside and exterior.
Know Your Filter Type First
Hood filters come in a few types, and only some can be washed. The U.S. Department of Energy’s Building America guide to range hood filters covers washable, disposable and carbon filters:
| Filter type | How to recognize it | Washable? | How often |
|---|---|---|---|
| Metal mesh | Layered metal screen | Yes | About every 3 months; more if you fry often |
| Baffle | Angled stainless or aluminum channels | Yes | Similar schedule; check your manual |
| Disposable foil | Multi-layer foil pad | No — replace | Every 3–6 months |
| Carbon (charcoal) | Dark, fibrous pad in ductless hoods | No — replace | Per the hood manual |
The DOE guide is clear that carbon filters in non-ducted hoods are not reusable and must be replaced, so there’s no point trying to clean a range hood charcoal filter. The baffle schedule is our practical guidance, since the DOE guide doesn’t address baffles separately.
How to Clean a Range Hood Filter
- Turn the hood off, let it cool, and slide or unlatch the filter. Hold a towel underneath if it’s dripping.
- Fill the sink with very hot water, a good squirt of dish soap and a few spoonfuls of baking soda.
- Submerge the filter and let it soak until the grease starts to release.
- Brush gently with a soft-bristle brush, as the DOE guide recommends; hard scrubbing can bend the mesh.
- Rinse with hot water and let it air dry completely before reinstalling.
- While it dries, wipe the sticky underside of the range hood and the fan grille with a soapy cloth.
The same soak works for a stove vent filter on an over-the-range unit, and it’s the core of how to clean a kitchen exhaust fan you can reach without tools.
Can Range Hood Filters Go in the Dishwasher?
Often, yes. The DOE guide says washable filters can go on the top rack of the dishwasher. In our experience, some aluminum filters discolor in the dishwasher; it’s cosmetic, but check your hood’s manual first. Run a very greasy filter on its own or soak it beforehand so the grease doesn’t redeposit on your dishes.
How to Remove Grease From a Stainless Steel Stove Hood
- Wash the hood exterior with warm soapy water and a nonabrasive sponge, rubbing in the direction of the grain, as Whirlpool advises for traditional stainless steel.
- Rinse with a clean damp cloth.
- Dry and buff with a dry microfiber cloth, again with the grain.
- Skip vinegar- and citrus-based cleaners, steel wool and oven cleaner on traditional stainless, and check your own model’s manual — especially for black stainless or fingerprint-resistant finishes.
If your “hood” is an over-the-range microwave, clean its vent filter with the soak above, and see our tips for cleaning the inside of the microwave.
What You See, What It Means, What to Do First
If you’ve already cleaned and something still looks wrong, match the symptom to its most likely cause:
| What you see | Likely cause | First fix |
|---|---|---|
| Sticky, tacky film after wiping | Grease smeared, not lifted | Soap straight on the cloth, then rinse |
| Dull or hazy patch on cabinets | Soap residue or finish wear | Rinse and dry; if it stays, finish is worn |
| Streaks or white marks on stainless hood | Cleaner residue or wiping across the grain | Soapy water, then buff with the grain |
| Brown rings on a glass top | Burned-on residue | Cooktop cream + scraper at ~45° |
| Cooking smells linger with the hood on | Clogged mesh or spent carbon filter | Wash or replace the filter |
| Grease gone, wood rough or blotchy | Finish worn through | Stop cleaning; consider refinishing |
The last row is the one most people miss. When older cabinets still look bad after careful cleaning, the grease has often been gone for a while — what’s left is worn finish, and more scrubbing only makes it worse.
How to Keep Grease From Building Up Again
Prevention starts with ventilation. The EPA’s guidance on cooking and indoor air recommends turning on an outdoor-venting range hood whenever you cook, leaving it on for 10–20 minutes afterward, using the back burners when possible, and routinely cleaning the hood’s grease filter. The back-burner advice has data behind it: a Berkeley Lab study of residential range hoods found that all seven hoods tested captured pollutants from the back burners better than from the front, with capture efficiency ranging from less than 15% to more than 98%. Put the splattery pan in back, run the hood on a real setting, and keep the filter clean.
In Wisconsin, ventilation matters even more. Around 34 percent of the nearly 2.4 million homes in the state use natural gas for cooking, as Wisconsin Public Radio reported from federal data. EPA’s fallback when you don’t have a hood — opening doors and windows — depends on the weather allowing it, and for much of a Wisconsin winter it doesn’t. In a closed-up house, the range hood and a clean filter do most of the work. Lids and splatter screens on frying pans help too, since grease that never leaves the pan never lands on the cabinets.
A few minutes on a schedule beats a full Saturday of scrubbing:
| Task | How often | Why |
|---|---|---|
| Run the hood during cooking + 10–20 min after | Every time you cook | EPA recommendation |
| Wipe the stove top and backsplash | After cooking or daily | Fresh grease lifts easily |
| Wipe cabinet doors near the stove and handles | Weekly | Stops layers from forming |
| Full cabinet degrease | Every 1–3 months | Depends on how much you fry |
| Wash metal hood filter | About every 3 months | DOE guidance; more if frying often |
| Replace disposable filter | Every 3–6 months | DOE guidance |
| Replace carbon filter | Per the manual | Not washable |
The weekly and monthly rows are our practical guidance from cleaning real kitchens; if keeping up with them is the hard part, a recurring cleaning plan keeps the regular wipe-downs on schedule so the full degrease stays a quick job.
What a House Cleaner Can and Can’t Fix
Some grease problems are cleaning jobs, and some belong to a different trade. Here’s how that split looks from Badger Luxe Cleaning’s own service scope:
Within a house cleaner’s scope:
- Routine cleaning of the stovetop, backsplash, appliance surfaces and cabinet exteriors as part of standard cleaning.
- The detail work — the stove hood, inside cabinets and drawers, and the oven interior — as part of deep cleaning, the right fit when you need to deep clean a kitchen that’s fallen behind.
- The same kitchen detail before you hand back the keys, with move-out cleaning.
- For a room-by-room view of what’s covered, see our cleaning checklist.
Better handled by a different pro:
- Hood ductwork and commercial-style exhaust cleaning — a ventilation specialist.
- Cabinets whose finish is worn through — a cabinet refinisher.
- A hood fan that runs but doesn’t pull air — an appliance or HVAC technician.
- Replacement filters — match them to your hood’s model number, as the DOE guide recommends.
Getting a Greasy Kitchen Back on Track With Badger Luxe Cleaning
When the cabinets above the stove, the cooktop and the hood all need attention at once, it’s more than a quick weekend wipe-down. Badger Luxe Cleaning’s background-checked, highly trained local cleaners know that the same cleaner that’s fine on laminate can cloud a stained door or streak a stainless hood, and they work from the gentle end of the ladder first. We use non-toxic, eco-friendly green cleaning products, which matters on surfaces a few inches from where you prepare food.
Every visit follows a customized cleaning checklist, so you can ask us to focus on exactly what’s bothering you — the doors over the range, the cabinet tops, the stove hood. There’s no long-term contract: book a one-time clean or go month-to-month, and cancel anytime without penalty. We’re a local Wisconsin team with transparent pricing, and you can estimate a deep clean with our cost calculator before you book.
FAQ
How often should I clean a range hood filter?
For washable metal mesh filters, about every 3 months is the DOE’s Building America guidance, and more often if you fry or sear several times a week. Disposable foil filters should be replaced every 3–6 months, and carbon filters replaced on the schedule in your hood’s manual.
Does vinegar remove grease from kitchen cabinets?
It can help with light grease, and one cabinet manufacturer allows an occasional 50/50 vinegar and warm water mix on wood. The same manufacturer says not to use it on melamine, UV lacquer, acrylic or laminate, and Whirlpool advises against vinegar-based cleaners on traditional stainless steel, so dish soap is the safer first step. If you do use it, our comparison of cleaning vinegar vs. white vinegar explains which one to pick.
Does Murphy’s Oil Soap remove grease from kitchen cabinets?
On finished wood, yes — the label lists cabinets among its uses and calls for about ¼ cup per gallon of warm water, or about ½ cup for heavy cleaning. Wring the cloth out well and test a hidden spot first. It’s labeled for finished wood, so for laminate, painted or stainless cabinets, stick with dish soap.
Can I use Dawn dish soap on the stove top?
Yes, a grease-cutting dish soap in warm water is a good everyday cleaner for most stove tops and grates: wipe, rinse with plain water and dry. For burned-on residue on glass or ceramic tops, GE recommends an approved cooktop cleaner and a razor scraper instead.
How do you remove old, hardened grease?
Soften it before you scrub: let soapy water or a baking-soda paste sit on the spot for several minutes, then lift it with a soft brush or non-scratch pad. Repeat light passes rather than pressing harder. If the surface underneath turns out rough or patchy, the finish is gone, and more scrubbing won’t fix it.
If the grease on your cabinets, stove top and range hood has gotten ahead of you, Badger Luxe Cleaning can take it from here with a one-time deep clean or a recurring plan built around your kitchen. Call us at (920) 777-9609 or email nathan@badgerluxecleaning.com to talk through what your kitchen needs.